.png)

Create a ZCU102 PS in Vivado 2019.1
- Zach Pfeffer
- May 8, 2020
- 2 min read
Updated: May 14, 2023

This post shows how to create a ZCU102 PS (Processor Subsystem) in Vivado 2019.1 that allows you to "run code" on the Zynq UltraScale+ MPSoC.
Steps
Step #1: Install Vivado 2019.1 with the SDK option
Follow the steps at [link]
Step #2: Start Vivado
On Windows 7: (A) click Start, (B) click All Programs
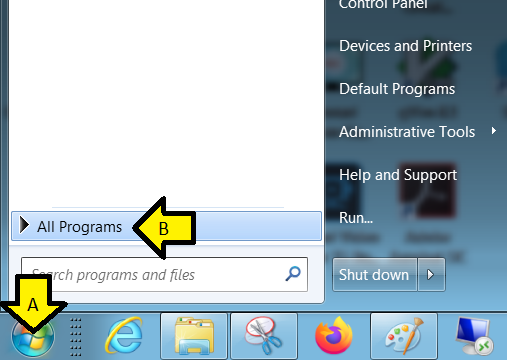
(C) click Xilinx Design Tools, (D) click Vivado 2019.1, and (E) click Vivado 2019.1

Step #3: Click Create Project

Step #4: Click Next >

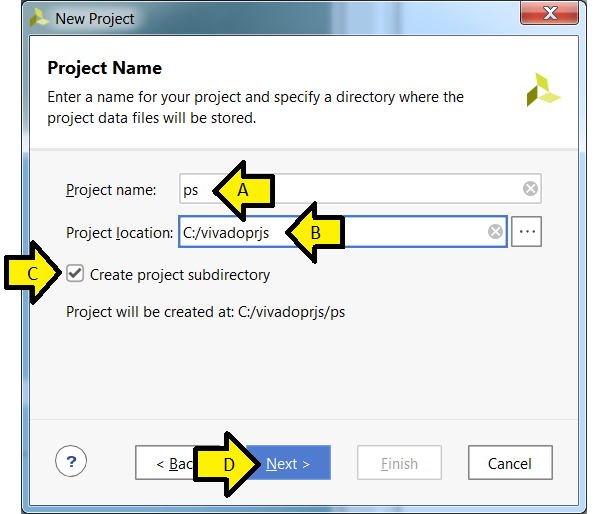
Step #5: Set the Project Name and Location
A) Project name: ps
B) Project location C:/vivadoprjs
C) Leave checked: Create project subdirectory
D) Click Next >
Step #6: Specify the Project Type
A) Leave RTL Project selected
B) Leave Do not specify sources at this time selected
C) Click Next >

Step #7: Specify the board
A) Click Boards
B) Type ZCU102
C) Click inside the Zynq UltraScale+ ZCU102 Evaluation Board box (so it turns blue)
D) Click Next >

Step #8: Click Finish

Note: Here is the text of this window:
The default part and product family for the new project: Default Board: Zynq UltraScale+ ZCU102 Evaluation Board Default Part: xczu9eg-ffvb1156-2-e Product: Zynq UltraScale+ Family: Zynq UltraScale+ MPSoCs Package: ffvb1156 Speed Grade: -2
Step #9: Create a Block Design
A) Click Create Block Design
B) Use default Design name: design_1
C) Click OK

Step #10: Add the Zynq UltraScale+ MPSoC to the Block Design
A) Click +
B) Type zynq
C) Double-click Zynq UltraScale+ MPSoC

Step #11: Click Run Block Automation

Step #12:
A) Leave All Automation and zynq_ultra_ps_e_0 checked
B) Leave Apply Board Preset checked
C) Click OK

Step #13:
A) Double click the Zynq UltraScale+ MPSoC block

B) Click PS-PL Configuration
C) Expand PS-PL Interfaces
D) Expand Master Interface
E) Uncheck AXI HPM0 FPD
F) Uncheck AXI HPM1 FPD
G) Click OK

Step #14: Create an HDL Wrapper
A) Right-click design_1 (design_1.bd)
B) Click Create HDL Wrapper...

C) Leave Let Vivado manage wrapper and auto-update selected
D) Click OK

Step #15: Generate Output Products
A) Expand design_1_wrapper (design_1)wrapper.v) (1)
B) Right-click design_1_i : design_1 (design_1.bd) (1)
C) Click Generate Output Products...

D) Click Generate

You should see:

E) Observe Generate Output Products status
F) Click OK

G) Wait until the status says Ready

Step #16: Export the hardware to the SDK
A) Click File
B) Click Export
C) Click Export Hardware...

D) Leave Include bitstream unchecked
E) Click OK

Step #17: Launch the SDK
A) Click File
B) Click Launch SDK

C) Click OK

You should see:

Followed by:

References