Resize a Virtual Machine Hard Disk in VMware Workstation 16 and Ubuntu 22.04.1 LTS
- Zach Pfeffer
- Aug 3, 2023
- 1 min read

This post shows step-by-step how to resize a Virtual Machine Hard Disk in VMware Workstation 16 and Ubuntu 22.04.1 LTS.
Prereqs
You'll need the sudo password in your Ubuntu install
Expand the Disk in VMware Workstation 16
Launch VMware Workstation Pro

Find the VM that needs a larger hard disk.

Double-click the Hard Disk (SCSI) and click Expand...

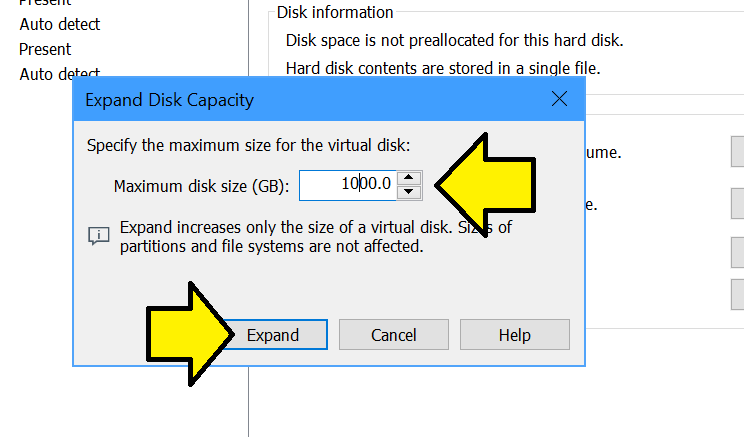
Increase the Maximum disk size (GB) and click Expand (this may take a moment - it took my computer 10 minutes).

Click OK:

Note: you may need to move the disk from, for example, C:\Users\Zach Pfeffer\Documents\Virtual Machines\vmwaredisk-20230708-vivado_22.04.1-on-ubuntu_22.04.01\vmwaredisk-20230708-vivado_22.04.1-on-ubuntu_22.04.01.vmdk to a disk with more room. See How to Permanently Mount an External Drive as a Folder on Windows 10 to ensure this location persists.
Expand the Disk In Ubuntu
Power on the virtual machine and boot Ubuntu completely

Run disks

Select the drive, select the partition, click the gear:

Click Resize...

Drag the slider to the right and click Resize

Versions
In PowerShell:
Windows version:
systeminfo | findstr /B /C:"OS Name" /B /C:"OS Version"Output:
OS Name:                   Microsoft Windows 10 Pro
OS Version:                10.0.19045 N/A Build 19045
VMware Workstation version:
Get-WmiObject -Class Win32_Product | where vendor -eq "VMware, Inc." | select Name, VersionOutput:
Name               Version
----               -------
VMware Workstation 16.2.4
In a terminal on Ubuntu:
lsb_release -aOutput:
No LSB modules are available.
Distributor ID:	Ubuntu
Description:	Ubuntu 22.04.1 LTS
Release:	22.04
Codename:	jammy
This post showed how to resize a Virtual Machine Hard Disk in VMware Workstation 16 and Ubuntu 22.04.1 LTS.
References
VMware Workstation 16 Logo from: https://commons.wikimedia.org/wiki/File:Vmware_workstation_16_icon.svg
.png)
