.png)

Run the Xilinx ZC702 Built-In Self-Test on Windows 10
- Zach Pfeffer
- Jul 9, 2023
- 2 min read

This post shows how to run the Xilinx ZC702 Built-In Self-Test on Windows 10. It follows the original instructions included in the kit and substitutes tools available for Windows 10.
Install the CP210x USB-to_UART Drivers
# Check version of Windows 10 is at least 1803 (we're at 19045)
Using this command from [ https://stackoverflow.com/questions/7330187/how-to-find-the-windows-version-from-the-powershell-command-line ]:
systeminfo /fo csv | ConvertFrom-Csv | select OS*, System*, Hotfix* | Format-ListOutput:
OS Name             : Microsoft Windows 10 Pro
OS Version          : 10.0.19045 N/A Build 19045
OS Manufacturer     : Microsoft Corporation
OS Configuration    : Standalone Workstation
OS Build Type       : Multiprocessor Free
System Boot Time    : 5/11/2023, 12:59:23 PM
System Manufacturer : LENOVO
System Model        : 20MAS87F00
System Type         : x64-based PC
System Directory    : C:\WINDOWS\system32
System Locale       : en-us;English (United States)Hotfix(s)           : 22 Hotfix(s) Installed.,[01]: KB5022502,[02]: KB4562830,[03]: KB4580325,[04]: KB5000736,[05]: KB5012170,[06]: KB5015684,[07]: KB5026361,[08]:KB5006753,[09]: KB5007273,[10]: KB5011352,[11]: KB5011651,[12]: KB5014032,[13]: KB5014035,[14]: KB5014671,[15]: KB5015895,[16]: KB5016705,[17]:KB5018506,[18]: KB5020372,[19]: KB5022924,[20]: KB5023794,[21]: KB5025315,[22]: KB5005699
# Download https://www.silabs.com/documents/public/software/CP210x_Universal_Windows_Driver.zip from https://www.silabs.com/developers/usb-to-uart-bridge-vcp-drivers?tab=downloads to Downloads
# Extract All
# Browse to the unzipped folder C:\Users\Zach Pfeffer\Downloads\CP210x_Universal_Windows_Driver
# Right-click on the silabser.inf file and select Install
# Follow the instructions
Install PuTTY
# Go to https://www.putty.org/
# Use 64-bit x86: putty-64bit-0.78-installer.msi
# Install using defaults
Check the Jumpers
Zynq-7000 All Programmable SoC: ZC702 Evaluation Kit and Video and Imaging Kit Getting Started Guide (ISE Design Suite 14.5)
Cached @ v4.0 @

Set Boot Mode Switches

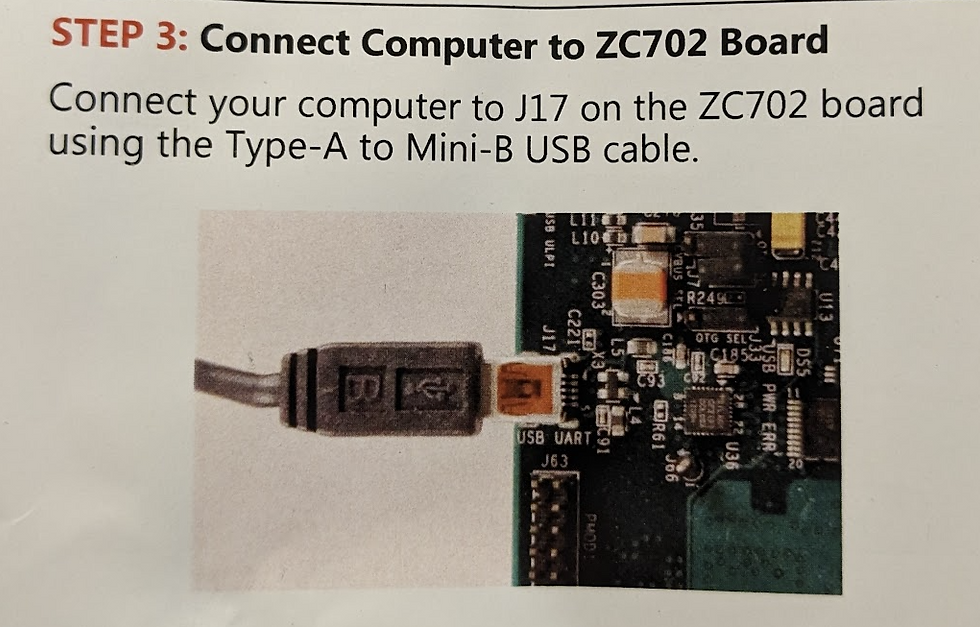
# Connect USB to the computer
# Connect power and turn on the board

Get the COM #
# Run System Information

# Expand Components and Ports and click Serial

COM7, in this case
Configure and Open PuTTY
# Select Serial and fill in COM7 (read above), 115200 baud, 8 data bits, 1 stop bit, no parity, no flow control.

# Select Session and select Serial. The COM should automatically populate. Click Open.

# Press SW1 (POR_B)

You should see:

This post showed how to run the Xilinx ZC702 Built-In Self-Test on Windows 10.
References
Xilinx logo clipped from xilinx.com